Motion Sequence Tutorial

I am taking a leap by posting my first, ever, computer tutorial! I have shied away from attempting to share a photoshop or blogger how-to in the past, but this may be the start of something new...
This semester I am taking a photography class because I need major help with certain skills. When we were challenged with an assignment that deals with 'motion', I was excited to use my beautiful sister-in-law as my model. She is an amazing dancer so I knew she would be perfect to show off some leaps and kicks for me. We shot at twilight at the end of a rainstorm, so the lighting is darker and the road is sparkling.
My objective was to layer these photos into one so that it created a motion sequence. This would be easier if her movements didn't overlap, but there is a way around that! Scroll to the bottom of the post to see the end results.
Settings:
ISO: 3200
SS: 1/320s
Aperture: f/3.5
Lense: 18-55mm

The first step is to select the 4 photos in Adobe Bridge in order to quickly layer them in Photoshop. (You can totally do this manually and skip using Bridge altogether, but I like to use it for some quick organizing and editing anyways.)


Make sure that your background is lined up by using the Auto-Align feature under Edit.

After aligning layers, quickly check to make sure that they are undeed lined up. Then simply use the Auto-Blend feature under Edit. If the main focus of your photos (ie, the dancer) do not overlap, choose the 'panorama' option. However, if they are overlapping like mine, choose 'stack images'.

The process to stack layers may take a bit of time, but once it's done you will be a left with a collage of your photos that looks similar to the one above. Sometimes Photoshop is unsure about your needs and cuts out the wrong areas. As you can see, Sarah's coat is ghosty, her feet have disappeared and her leaping-leg is coming out of the middle of her body.
It actually looks kindof cool, but we can fix them!
(I have labeled the rest of the tools you will need in order to complete this tutorial. They are probably obvious, but I hate when I am left searching for hours, trying to find the mentioned button in a how-to!)

Try hiding all of the layers except for the first one by toggling between the eye icons next to each layer. This will show you what a single photo looks like after being auto-blended. The black and white boxes next to each layer are called 'layer masks'. These are tools that Photoshop uses to erase certain parts of each layer so that the whole project is accurately stacked. Although Photoshop messed up in some areas, we can go back through each photo and manually erase or add certain areas to get the desired effect.
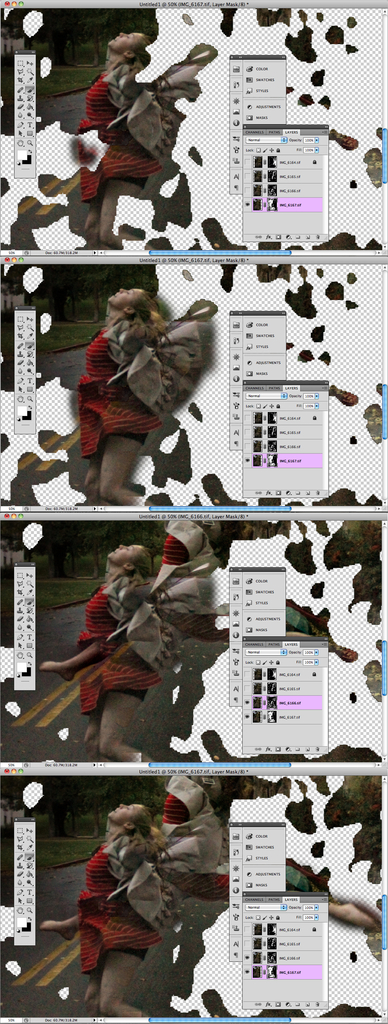
Start by only looking at the first layer. You can tell that Sarah's stomach is erased and her legs are gone. Select the layer mask of this layer to make sure that you are working on right canvas.
With layer masks you erase and add by using the paint tool. For this tutorial you only need two colors: black and white. Black erases parts of the photo and white adds to the layer.
First, using the paint tool with white selected, fill in every part of your first layer that was cut out. This is the easy part.
Second, view the second layer and select it's layer mask. Continue adding and subtracted between the two layers until they are cohesive. Once you get the hang of it, the rest of the editing will be a piece of cake.
Continue erasing and adding by going through each layer mask. There may be a few layers at the beginning that are covering up the last layers so make sure you take note and erase the right areas.

I hope this tutorial was simple enough. I decided to try my own how-to because when I was searching for a similar tutorial, I couldn't find one I liked. So, I made my own. Let me know what you think!